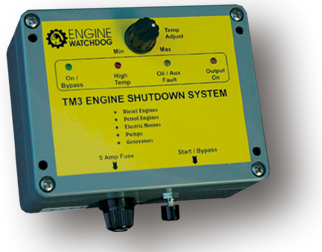


SUPERCEDED BY THE TM6
INSTALLATION INSTRUCTIONS.
1 Mount the unit upright with a water loop in the cabling and away from vibration, weather and direct water damage (On a post and covered, if no other support is handy).
Use the screws and mounting holes provided, or Silastic the unit into place. Do not mount the unit upside down or allow it to swing around freely on its wiring.
2 Bolt the sensor firmly to the engine in a location that will reflect its working temperature, yet not exceed 125 deg. C. (avoid mounting the sensor near the exhaust manifold). Do not bend the wire at the sensor sharply.
If the sensor hole needs enlarging carefully file it, do not use a large drill or squash the sensor barrel in a vice.
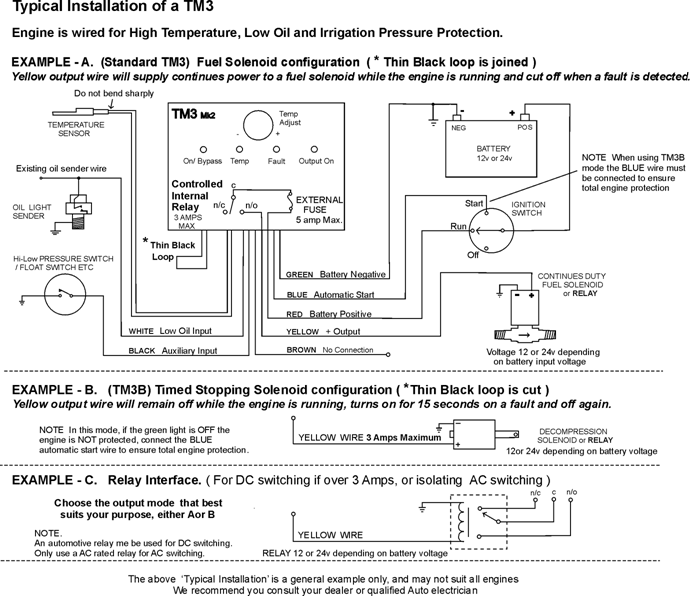
3. Wire as per the diagram. Diagram A if using a Fuel Solenoid or Relay. B. If using a timed Stopping Solenoid or Relay
Power wires are via the ignition switch.
Oil pressure wire goes to an oil light sender. (Not a pressure gauge sender.) If the engine is not equipped with an oil light sender, discard this wire or fit a sender that uses normally closed contacts with no oil pressure. (standard car type).
INITIAL SET UP INSTRUCTIONS. Setting the Temperature.
1. Turn “Temp set” adjustment fully clockwise to Max (Red light is off)
2. If the ‘blue’ automatic start wire is connected, continue to start the engine.
If the’ blue’ automatic start wire is not connected, first press the ‘Start / Bypass’ switch and then start the engine.
3. At this point, the green light will start blinking for one minute and then stay on continuously. While the green light is blinking, the unit is in bypass mode and no faults will stop the engine. All faults must be cleared ( yellow light off ) before the green light stops blinking. If you require more bypass time than one minute, hold the bypass button down.
4. Run the engine to operating temperature.
5. Hold the ‘Start / Bypass’ switch down and adjust the temperature knob while the unit is in the bypass state (green light blinking). Turn the ‘Temp Set’ knob back (anti clockwise) until the red light comes on (yellow fault light will also come on). Then forward again until the red light goes out, go another two to three millimetres forward to allow for times the engine is working hard. Mark this spot.
6. Once the temperature knob has been set, there is no need to alter it when normally starting the engine.
NORMAL ENGINE STARTING. If using the TM3B mode, the blue automatic start wire must be connected.
1. Turn the ignition to run, the red light should be off and the yellow light on if either the white or black wires are used)
2. If the blue auto start wire is connected, continue to start the engine. The green light will start blinking.
If the blue auto start wire is not connected, press the ‘Start / Bypass’ switch then start the engine. SEE NOTE
- By the time the green light stops blinking and is permanently on, the engine should be running and all pressures stabilized ( yellow light must be off ). Hold the bypass button down if extra time is required.
TESTING THE SYSTEM.
To test any function, wait until the green light stops blinking and is permanently on. Now, if the yellow fault light comes on the orange output light will change state. To test the temperature function, turn the ‘Temp Set’ knob back so as the red and yellow lights come on (returning it to the marked spot after the test). For testing low oil or the auxiliary function, short the white or black wire to negative so as only the yellow fault light comes on.
Trouble Shooting:
General
Unit will not come on and no lights are indicating. - Check the Fuse (5A Max). - Check for correct wiring (see diagram)
Fuse blows. Check wiring diagram. - Check for shorts (isolate un-used wires). - Check output is not drawing excessive current (3A max.)
Engine stops but no fault is evident. – Check the temperature setting. – Check oil or auxiliary circuits. – Check connections
Engine stops after green light stops blinking – Ensure all fault conditions have cleared by one minute and yellow fault light is off.
Unit is intermittent or erratic. - Check connections (crimps) - Check for excessive vibration, water damage or ant invasion
Red temperature light is on but has no adjustment. - Check sensor position (125 deg C Max). - Check sensor wire for a short, or if crushed
Red temperature light will not come on. – Check if the sensor wire is broken along its length, at the sensor, or if the cable is crushed
Standard TM3. Mode A - Fuel Solenoid configuration
Orange output light is off when green bypass light is blinking – Unit is in a TM3B mode, join the small black link
Engine will not stop even if red or yellow lights are on – Check if bypass is on (green light blinking). Check fuel is not bypassing the solenoid
via a bleed pipe, bleed pipes must return to the top of the tank, (the engine must stop when the yellow wire is disconnected from a fuel solenoid).
TM3B. Mode B - Stopping Solenoid configuration
Orange output light is on when green bypass light is blinking - Unit is in a standard TM3 mode, cut the small black link
Green light does not come on. – Engine is unprotected, press the manual start button or connect the blue automatic start wire to the ignition.